上一個教程: 霍夫圓變換
下一個教程: 重對映
| |
| 原始作者 | Markus Heck |
| 相容性 | OpenCV >= 3.4 |
目標
在本教程中,您將學習如何
示例
此程式的作用是什麼?
- 載入影像和模板


- 藉助
createGeneralizedHoughBallard() 例項化 cv::GeneralizedHoughBallard
- 藉助
createGeneralizedHoughGuil() 例項化 cv::GeneralizedHoughGuil
- 為兩種廣義霍夫變體設定所需的引數
- 檢測並顯示找到的結果
- 注意
- 兩種變體都不能直接例項化。需要使用建立方法。
- Guil Hough 非常慢。計算本教程中使用的“mini”檔案的結果只需幾秒鐘。使用更高解析度的影像和模板,如下所示,我的筆記型電腦需要大約 5 分鐘才能計算出結果。


程式碼
本教程的完整程式碼如下所示。
samples::addSamplesDataSearchSubDirectory("doc/tutorials/imgproc/generalized_hough_ballard_guil");
Mat image = imread(samples::findFile(
"images/generalized_hough_mini_image.jpg"));
Mat templ = imread(samples::findFile(
"images/generalized_hough_mini_template.jpg"), IMREAD_GRAYSCALE);
cvtColor(image, grayImage, COLOR_RGB2GRAY);
vector<Vec4f> positionBallard, positionGuil;
ballard->setMinDist(10);
ballard->setLevels(360);
ballard->setDp(2);
ballard->setMaxBufferSize(1000);
ballard->setVotesThreshold(40);
ballard->setCannyLowThresh(30);
ballard->setCannyHighThresh(110);
ballard->setTemplate(templ);
guil->setMinDist(10);
guil->setLevels(360);
guil->setDp(3);
guil->setMaxBufferSize(1000);
guil->setMinAngle(0);
guil->setMaxAngle(360);
guil->setAngleStep(1);
guil->setAngleThresh(1500);
guil->setMinScale(0.5);
guil->setMaxScale(2.0);
guil->setScaleStep(0.05);
guil->setScaleThresh(50);
guil->setPosThresh(10);
guil->setCannyLowThresh(30);
guil->setCannyHighThresh(110);
guil->setTemplate(templ);
ballard->detect(grayImage, positionBallard);
guil->detect(grayImage, positionGuil);
for (vector<Vec4f>::iterator iter = positionBallard.begin(); iter != positionBallard.end(); ++iter) {
Size2f(w * (*iter)[2], h * (*iter)[2]),
(*iter)[3]);
for (int i = 0; i < 4; i++)
line(image, vertices[i], vertices[(i + 1) % 4],
Scalar(255, 0, 0), 6);
}
for (vector<Vec4f>::iterator iter = positionGuil.begin(); iter != positionGuil.end(); ++iter) {
Size2f(w * (*iter)[2], h * (*iter)[2]),
(*iter)[3]);
for (int i = 0; i < 4; i++)
line(image, vertices[i], vertices[(i + 1) % 4],
Scalar(0, 255, 0), 2);
}
imshow("result_img", image);
cv::Mat::empty
return EXIT_SUCCESS;
}
int rows
行數和列數,如果矩陣具有超過 2 個維度,則為 (-1, -1)
定義 mat.hpp:2165
該類表示平面上旋轉的(即,非正立的)矩形。
定義 types.hpp:538
void points(Point2f pts[]) const
std::shared_ptr< _Tp > Ptr
Definition cvstd_wrapper.hpp:23
int main(int argc, char *argv[])
定義 highgui_qt.cpp:3
解釋
載入影像、模板和設定變數
samples::addSamplesDataSearchSubDirectory("doc/tutorials/imgproc/generalized_hough_ballard_guil");
Mat image =
imread(samples::findFile(
"images/generalized_hough_mini_image.jpg"));
Mat templ =
imread(samples::findFile(
"images/generalized_hough_mini_template.jpg"), IMREAD_GRAYSCALE);
cvtColor(image, grayImage, COLOR_RGB2GRAY);
vector<Vec4f> positionBallard, positionGuil;
位置向量將包含檢測器將找到的匹配項。每個條目包含四個浮點值:位置向量
- [0]:中心點的 x 座標
- [1]:中心點的 y 座標
- [2]:檢測到的物件相對於模板的比例
- [3]:檢測到的物件相對於模板的旋轉角度(度)
一個例子可能如下所示:[200, 100, 0.9, 120]
設定引數
ballard->setMinDist(10);
ballard->setLevels(360);
ballard->setDp(2);
ballard->setMaxBufferSize(1000);
ballard->setVotesThreshold(40);
ballard->setCannyLowThresh(30);
ballard->setCannyHighThresh(110);
ballard->setTemplate(templ);
guil->setMinDist(10);
guil->setLevels(360);
guil->setDp(3);
guil->setMaxBufferSize(1000);
guil->setMinAngle(0);
guil->setMaxAngle(360);
guil->setAngleStep(1);
guil->setAngleThresh(1500);
guil->setMinScale(0.5);
guil->setMaxScale(2.0);
guil->setScaleStep(0.05);
guil->setScaleThresh(50);
guil->setPosThresh(10);
guil->setCannyLowThresh(30);
guil->setCannyHighThresh(110);
guil->setTemplate(templ);
找到最佳值可能最終會進行反覆試驗,並且取決於許多因素,例如影像解析度。
執行檢測
ballard->detect(grayImage, positionBallard);
guil->detect(grayImage, positionGuil);
如上所述,此步驟將花費一些時間,尤其是在使用較大的影像和使用 Guil 時。
繪製結果並顯示影像
for (vector<Vec4f>::iterator iter = positionBallard.begin(); iter != positionBallard.end(); ++iter) {
Size2f(w * (*iter)[2], h * (*iter)[2]),
(*iter)[3]);
for (int i = 0; i < 4; i++)
line(image, vertices[i], vertices[(i + 1) % 4],
Scalar(255, 0, 0), 6);
}
for (vector<Vec4f>::iterator iter = positionGuil.begin(); iter != positionGuil.end(); ++iter) {
Size2f(w * (*iter)[2], h * (*iter)[2]),
(*iter)[3]);
for (int i = 0; i < 4; i++)
line(image, vertices[i], vertices[(i + 1) % 4],
Scalar(0, 255, 0), 2);
}
結果
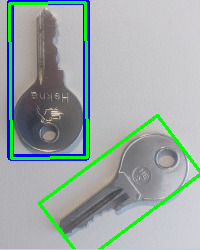
結果影像
藍色矩形顯示 cv::GeneralizedHoughBallard 的結果,綠色矩形顯示 cv::GeneralizedHoughGuil 的結果。
如果引數沒有完美地適應樣本,則不太可能獲得像此示例中那樣的完美結果。下面顯示了一個引數不太完美的示例。對於 Ballard 變體,只有結果的中心在此影像上標記為一個黑點。矩形將與上一張影像上的相同。
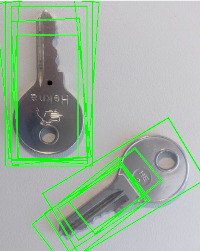
不太完美的結果