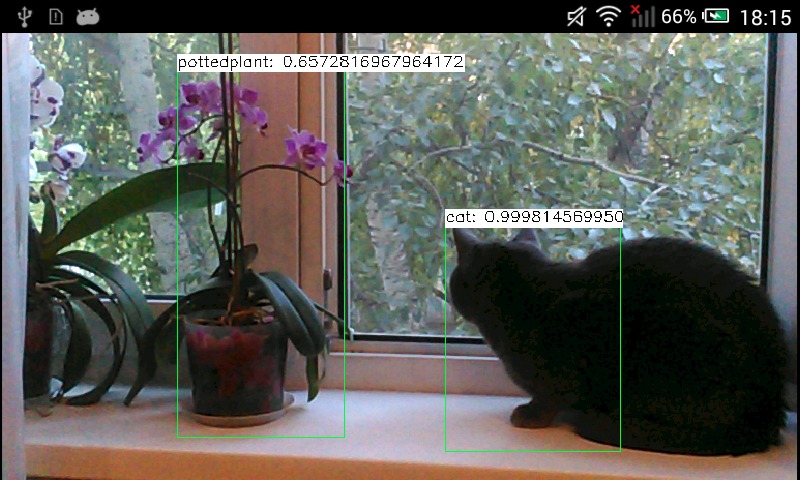
import android.content.Context;
import android.content.res.AssetManager;
import android.os.Bundle;
import android.util.Log;
import android.widget.Toast;
import org.opencv.android.CameraActivity;
import org.opencv.android.CameraBridgeViewBase;
import org.opencv.android.CameraBridgeViewBase.CvCameraViewFrame;
import org.opencv.android.CameraBridgeViewBase.CvCameraViewListener2;
import org.opencv.android.OpenCVLoader;
import org.opencv.core.Core;
import org.opencv.core.Mat;
import org.opencv.core.MatOfByte;
import org.opencv.core.Point;
import org.opencv.core.Scalar;
import org.opencv.core.Size;
import org.opencv.dnn.Net;
import org.opencv.dnn.Dnn;
import org.opencv.imgproc.Imgproc;
import java.io.InputStream;
import java.io.IOException;
import java.util.Collections;
import java.util.List;
public class MainActivity extends CameraActivity implements CvCameraViewListener2 {
@Override
public void onResume() {
super.onResume();
if (mOpenCvCameraView != null)
mOpenCvCameraView.enableView();
}
@Override
protected void onCreate(Bundle savedInstanceState) {
super.onCreate(savedInstanceState);
if (OpenCVLoader.initLocal()) {
Log.i(TAG, "OpenCV loaded successfully");
} else {
Log.e(TAG, "OpenCV initialization failed!");
(Toast.makeText(this, "OpenCV initialization failed!", Toast.LENGTH_LONG)).show();
return;
}
mModelBuffer = loadFileFromResource(R.raw.mobilenet_iter_73000);
mConfigBuffer = loadFileFromResource(R.raw.deploy);
if (mModelBuffer == null || mConfigBuffer == null) {
Log.e(TAG, "Failed to load model from resources");
} else
Log.i(TAG, "Model files loaded successfully");
net = Dnn.readNet("caffe", mModelBuffer, mConfigBuffer);
Log.i(TAG, "Network loaded successfully");
setContentView(R.layout.activity_main);
mOpenCvCameraView = (CameraBridgeViewBase)findViewById(R.id.CameraView);
mOpenCvCameraView.setVisibility(CameraBridgeViewBase.VISIBLE);
mOpenCvCameraView.setCvCameraViewListener(this);
}
@Override
public void onPause()
{
super.onPause();
if (mOpenCvCameraView != null)
mOpenCvCameraView.disableView();
}
@Override
protected List<? extends CameraBridgeViewBase> getCameraViewList() {
return Collections.singletonList(mOpenCvCameraView);
}
public void onDestroy() {
super.onDestroy();
if (mOpenCvCameraView != null)
mOpenCvCameraView.disableView();
mModelBuffer.release();
mConfigBuffer.release();
}
public void onCameraViewStarted(int width, int height) {
}
public Mat onCameraFrame(CvCameraViewFrame inputFrame) {
final int IN_WIDTH = 300;
final int IN_HEIGHT = 300;
final float WH_RATIO = (float)IN_WIDTH / IN_HEIGHT;
final double IN_SCALE_FACTOR = 0.007843;
final double MEAN_VAL = 127.5;
final double THRESHOLD = 0.2;
Log.d(TAG, "handle new frame!");
Mat frame = inputFrame.rgba();
Imgproc.cvtColor(frame, frame, Imgproc.COLOR_RGBA2RGB);
Mat blob = Dnn.blobFromImage(frame, IN_SCALE_FACTOR,
new Size(IN_WIDTH, IN_HEIGHT),
new Scalar(MEAN_VAL, MEAN_VAL, MEAN_VAL),
false,
false);
net.setInput(blob);
Mat detections = net.forward();
int cols = frame.cols();
int rows = frame.rows();
detections = detections.reshape(1, (int)detections.total() / 7);
for (int i = 0; i < detections.rows(); ++i) {
double confidence = detections.get(i, 2)[0];
if (confidence > THRESHOLD) {
int classId = (int)detections.get(i, 1)[0];
int left = (int)(detections.get(i, 3)[0] * cols);
int top = (int)(detections.get(i, 4)[0] * rows);
int right = (int)(detections.get(i, 5)[0] * cols);
int bottom = (int)(detections.get(i, 6)[0] * rows);
Imgproc.rectangle(frame,
new Point(left, top),
new Point(right, bottom),
String label = classNames[classId] +
": " + confidence;
int[] baseLine = new int[1];
Size labelSize = Imgproc.getTextSize(label, Imgproc.FONT_HERSHEY_SIMPLEX, 0.5, 1, baseLine);
Imgproc.rectangle(frame,
new Point(left, top - labelSize.height),
new Point(left + labelSize.width, top + baseLine[0]),
new Scalar(255, 255, 255), Imgproc.FILLED);
Imgproc.putText(frame, label,
new Point(left, top),
Imgproc.FONT_HERSHEY_SIMPLEX, 0.5,
new Scalar(0, 0, 0));
}
}
return frame;
}
public void onCameraViewStopped() {}
private MatOfByte loadFileFromResource(int id) {
byte[] buffer;
try {
InputStream is = getResources().openRawResource(id);
int size = is.available();
int bytesRead = is.read(buffer);
is.close();
} catch (IOException e) {
e.printStackTrace();
Log.e(TAG, "Failed to ONNX model from resources! Exception thrown: " + e);
(Toast.makeText(this, "Failed to ONNX model from resources!", Toast.LENGTH_LONG)).show();
return null;
}
return new MatOfByte(buffer);
}
private static final String TAG =
"OpenCV-MobileNet";
private static final String[] classNames = {
"background",
"aeroplane", "bicycle", "bird", "boat",
"bottle", "bus", "car", "cat", "chair",
"cow", "diningtable", "dog", "horse",
"motorbike", "person", "pottedplant",
"sheep", "sofa", "train", "tvmonitor"};
private MatOfByte mConfigBuffer;
private MatOfByte mModelBuffer;
private Net net;
private CameraBridgeViewBase mOpenCvCameraView;
}
Mat blob = Dnn.blobFromImage(frame, IN_SCALE_FACTOR,
new Size(IN_WIDTH, IN_HEIGHT),
new Scalar(MEAN_VAL, MEAN_VAL, MEAN_VAL),
false,
false);
net.setInput(blob);
Mat detections = net.forward();
int cols = frame.cols();
int rows = frame.rows();
detections = detections.reshape(1, (int)detections.total() / 7);
for (int i = 0; i < detections.rows(); ++i) {
double confidence = detections.get(i, 2)[0];
if (confidence > THRESHOLD) {
int classId = (int)detections.get(i, 1)[0];
int left = (int)(detections.get(i, 3)[0] * cols);
int top = (int)(detections.get(i, 4)[0] * rows);
int right = (int)(detections.get(i, 5)[0] * cols);
int bottom = (int)(detections.get(i, 6)[0] * rows);
Imgproc.rectangle(frame,
new Point(left, top),
new Point(right, bottom),
String label = classNames[classId] +
": " + confidence;
int[] baseLine = new int[1];
Size labelSize = Imgproc.getTextSize(label, Imgproc.FONT_HERSHEY_SIMPLEX, 0.5, 1, baseLine);
Imgproc.rectangle(frame,
new Point(left, top - labelSize.height),
new Point(left + labelSize.width, top + baseLine[0]),
new Scalar(255, 255, 255), Imgproc.FILLED);
Imgproc.putText(frame, label,
new Point(left, top),
Imgproc.FONT_HERSHEY_SIMPLEX, 0.5,
new Scalar(0, 0, 0));
}
}


