| |
| 原始作者 | Anastasia Murzova |
| 相容性 | OpenCV >= 4.5 |
目標
在本教程中,您將學習如何
- 獲取 TensorFlow (TF) 分類模型的凍結圖
- 使用 OpenCV Python API 執行轉換後的 TensorFlow 模型
- 獲取 TensorFlow 和 OpenCV DNN 模型的評估結果
我們將透過 MobileNet 架構的示例來探討以上列出的要點。
介紹
讓我們簡要了解一下 TensorFlow 模型透過 OpenCV API 進行轉換管道中的關鍵概念。將 TensorFlow 模型轉換為 cv.dnn.Net 的初始步驟是獲取凍結的 TF 模型圖。凍結圖定義了模型圖結構與所需變數的保留值的組合,例如權重。通常,凍結圖儲存在 protobuf (.pb) 檔案中。生成模型 .pb 檔案後,可以使用 cv.dnn.readNetFromTensorflow 函式讀取它。
要求
為了能夠嘗試以下程式碼,您需要安裝一組庫。我們將為此使用 python3.7+ 的虛擬環境
virtualenv -p /usr/bin/python3.7 <env_dir_path>
source <env_dir_path>/bin/activate
對於從原始碼構建的 OpenCV-Python,請按照OpenCV 簡介中的相應說明進行操作。
在開始安裝庫之前,您可以自定義 requirements.txt,排除或包含(例如,opencv-python)某些依賴項。以下行啟動將需求安裝到先前啟用的虛擬環境中
pip install -r requirements.txt
實踐
在本部分中,我們將介紹以下幾點
- 建立一個 TF 分類模型轉換管道並提供推理
- 評估和測試 TF 分類模型
如果您只想執行評估或測試模型管道,則可以跳過“模型轉換管道”教程部分。
模型轉換管道
此子章節中的程式碼位於 dnn_model_runner 模組中,可以使用以下行執行
python -m dnn_model_runner.dnn_conversion.tf.classification.py_to_py_mobilenet
以下程式碼包含以下列出步驟的描述
- 例項化 TF 模型
- 建立 TF 凍結圖
- 使用 OpenCV API 讀取 TF 凍結圖
- 準備輸入資料
- 提供推理
original_tf_model = MobileNet(
include_top=True,
weights="imagenet"
)
full_pb_path = get_tf_model_proto(original_tf_model)
opencv_net = cv2.dnn.readNetFromTensorflow(full_pb_path)
print("OpenCV 模型已成功讀取。模型層:\n", opencv_net.getLayerNames())
input_img = get_preprocessed_img("../data/squirrel_cls.jpg")
imagenet_labels = get_imagenet_labels("../data/dnn/classification_classes_ILSVRC2012.txt")
get_opencv_dnn_prediction(opencv_net, input_img, imagenet_labels)
get_tf_dnn_prediction(original_tf_model, input_img, imagenet_labels)
為了提供模型推理,我們將使用以下松鼠照片(在CC0 許可下),該照片對應於 ImageNet 類 ID 335
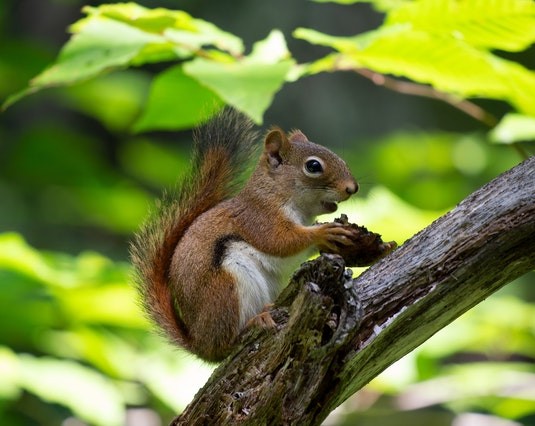
分類模型輸入影像
對於獲得的預測的標籤解碼,我們還需要 imagenet_classes.txt 檔案,其中包含 ImageNet 類的完整列表。
讓我們透過預訓練的 TF MobileNet 示例更深入地瞭解每個步驟
original_tf_model = MobileNet(
include_top=True,
weights="imagenet"
)
pb_model_path = "models"
pb_model_name = "mobilenet.pb"
os.makedirs(pb_model_path, exist_ok=True)
tf_model_graph = tf.function(lambda x: tf_model(x))
tf_model_graph = tf_model_graph.get_concrete_function(
tf.TensorSpec(tf_model.inputs[0].shape, tf_model.inputs[0].dtype))
frozen_tf_func = convert_variables_to_constants_v2(tf_model_graph)
frozen_tf_func.graph.as_graph_def()
tf.io.write_graph(graph_or_graph_def=frozen_tf_func.graph,
logdir=pb_model_path,
name=pb_model_name,
as_text=False)
成功執行上述程式碼後,我們將在 models/mobilenet.pb 中獲得一個凍結圖。
full_pb_path = get_tf_model_proto(original_tf_model)
- 使用 cv2.dnn.blobFromImage 函式準備輸入資料
input_img = cv2.imread(img_path, cv2.IMREAD_COLOR)
input_img = input_img.astype(np.float32)
mean = np.array([1.0, 1.0, 1.0]) * 127.5
scale = 1 / 127.5
input_blob = cv2.dnn.blobFromImage(
image=input_img,
scalefactor=scale,
size=(224, 224),
mean=mean,
swapRB=True,
crop=True
)
print("輸入 blob 形狀:{}\n".format(input_blob.shape))
請注意 cv2.dnn.blobFromImage 函式中的預處理順序。首先,減去平均值,然後才將畫素值乘以定義的比例。因此,為了重現 TF mobilenet.preprocess_input 函式中的影像預處理管道,我們將 mean 乘以 127.5。
結果,獲得了 4 維 input_blob
輸入 blob 形狀:(1, 3, 224, 224)
opencv_net.setInput(preproc_img)
out = opencv_net.forward()
print("OpenCV DNN 預測:\n")
print("* 形狀:", out.shape)
imagenet_class_id = np.argmax(out)
confidence = out[0][imagenet_class_id]
print("* 類 ID:{},標籤:{}".format(imagenet_class_id, imagenet_labels[imagenet_class_id]))
print("* 置信度:{:.4f}\n".format(confidence))
在上述程式碼執行後,我們將獲得以下輸出
OpenCV DNN 預測
* 形狀:(1, 1000)
* 類 ID:335,標籤:狐狸松鼠,東方狐狸松鼠,Sciurus niger
* 置信度:0.9525
preproc_img = preproc_img.transpose(0, 2, 3, 1)
print("TF 輸入 blob 形狀:{}\n".format(preproc_img.shape))
out = original_net(preproc_img)
print("\nTensorFlow 模型預測:\n")
print("* 形狀:", out.shape)
imagenet_class_id = np.argmax(out)
print("* 類 ID:{},標籤:{}".format(imagenet_class_id, imagenet_labels[imagenet_class_id]))
confidence = out[0][imagenet_class_id]
print("* 置信度:{:.4f}".format(confidence))
為了適應 TF 模型輸入,input_blob 被轉置
TF 輸入 blob 形狀:(1, 224, 224, 3)
TF 推理結果如下
TensorFlow 模型預測
* 形狀:(1, 1000)
* 類 ID:335,標籤:狐狸松鼠,東方狐狸松鼠,Sciurus niger
* 置信度:0.9525
從實驗中可以看出,OpenCV 和 TF 推理結果是相同的。
模型評估
dnn/samples 中提出的 dnn_model_runner 模組允許在 ImageNet 資料集上執行完整的評估管道,並測試以下 TensorFlow 分類模型的執行情況
- vgg16
- vgg19
- resnet50
- resnet101
- resnet152
- densenet121
- densenet169
- densenet201
- inceptionresnetv2
- inceptionv3
- mobilenet
- mobilenetv2
- nasnetlarge
- nasnetmobile
- xception
此列表也可以透過進一步適當的評估管道配置來擴充套件。
評估模式
以下行表示在評估模式下執行模組
python -m dnn_model_runner.dnn_conversion.tf.classification.py_to_py_cls --model_name <tf_cls_model_name>
從列表中選擇的分類模型將被讀取到 OpenCV cv.dnn_Net 物件中。TF 和 OpenCV 模型的評估結果(準確率、推理時間、L1)將被寫入日誌檔案。推理時間值也將顯示在圖表中,以概括獲得的模型資訊。
必要的評估配置在 test_config.py 中定義,並且可以根據資料位置的實際路徑進行修改:
@dataclass
class TestClsConfig
batch_size: int = 50
frame_size: int = 224
img_root_dir: str = "./ILSVRC2012_img_val"
img_cls_file: str = "./val.txt"
bgr_to_rgb: bool = True
TestClsConfig 中的值可以根據所選模型進行自定義。
要啟動 TensorFlow MobileNet 的評估,請執行以下行
python -m dnn_model_runner.dnn_conversion.tf.classification.py_to_py_cls --model_name mobilenet
指令碼啟動後,包含評估資料的日誌檔案將在 dnn_model_runner/dnn_conversion/logs 中生成
===== 使用以下引數執行模型的評估
* val 資料位置:./ILSVRC2012_img_val
* 日誌檔案位置:dnn_model_runner/dnn_conversion/logs/TF_mobilenet_log.txt
測試模式
以下行表示在測試模式下執行模組,即它提供了模型推理的步驟
python -m dnn_model_runner.dnn_conversion.tf.classification.py_to_py_cls --model_name <tf_cls_model_name> --test True --default_img_preprocess <True/False> --evaluate False
這裡 default_img_preprocess 鍵定義了您是否想使用某些特定值來引數化模型測試過程,或者使用預設值,例如,scale、mean 或 std。
測試配置在 test_config.py TestClsModuleConfig 類中表示
@dataclass
class TestClsModuleConfig
cls_test_data_dir: str = "../data"
test_module_name: str = "classification"
test_module_path: str = "classification.py"
input_img: str = os.path.join(cls_test_data_dir, "squirrel_cls.jpg")
model: str = ""
frame_height: str = str(TestClsConfig.frame_size)
frame_width: str = str(TestClsConfig.frame_size)
scale: str = "1.0"
mean: List[str] = field(default_factory=lambda: ["0.0", "0.0", "0.0"])
std: List[str] = field(default_factory=list)
crop: str = "False"
rgb: str = "True"
rsz_height: str = ""
rsz_width: str = ""
classes: str = os.path.join(cls_test_data_dir, "dnn", "classification_classes_ILSVRC2012.txt")
預設影像預處理選項在 default_preprocess_config.py 中定義。例如,對於 MobileNet
tf_input_blob = {
"mean": ["127.5", "127.5", "127.5"],
"scale": str(1 / 127.5),
"std": [],
"crop": "True",
"rgb": "True"
}
模型測試的基礎在 samples/dnn/classification.py 中表示。可以使用 --input 中提供的轉換模型和 cv.dnn.blobFromImage 的填充引數自主執行 classification.py。
要從頭開始重現“模型轉換管道”中描述的 OpenCV 步驟,請使用 dnn_model_runner 執行以下行
python -m dnn_model_runner.dnn_conversion.tf.classification.py_to_py_cls --model_name mobilenet --test True --default_img_preprocess True --evaluate False
網路預測顯示在輸出視窗的左上角
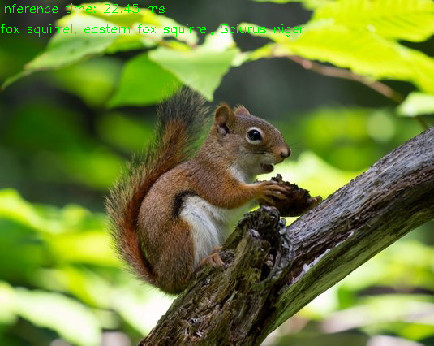
TF MobileNet OpenCV 推理輸出